
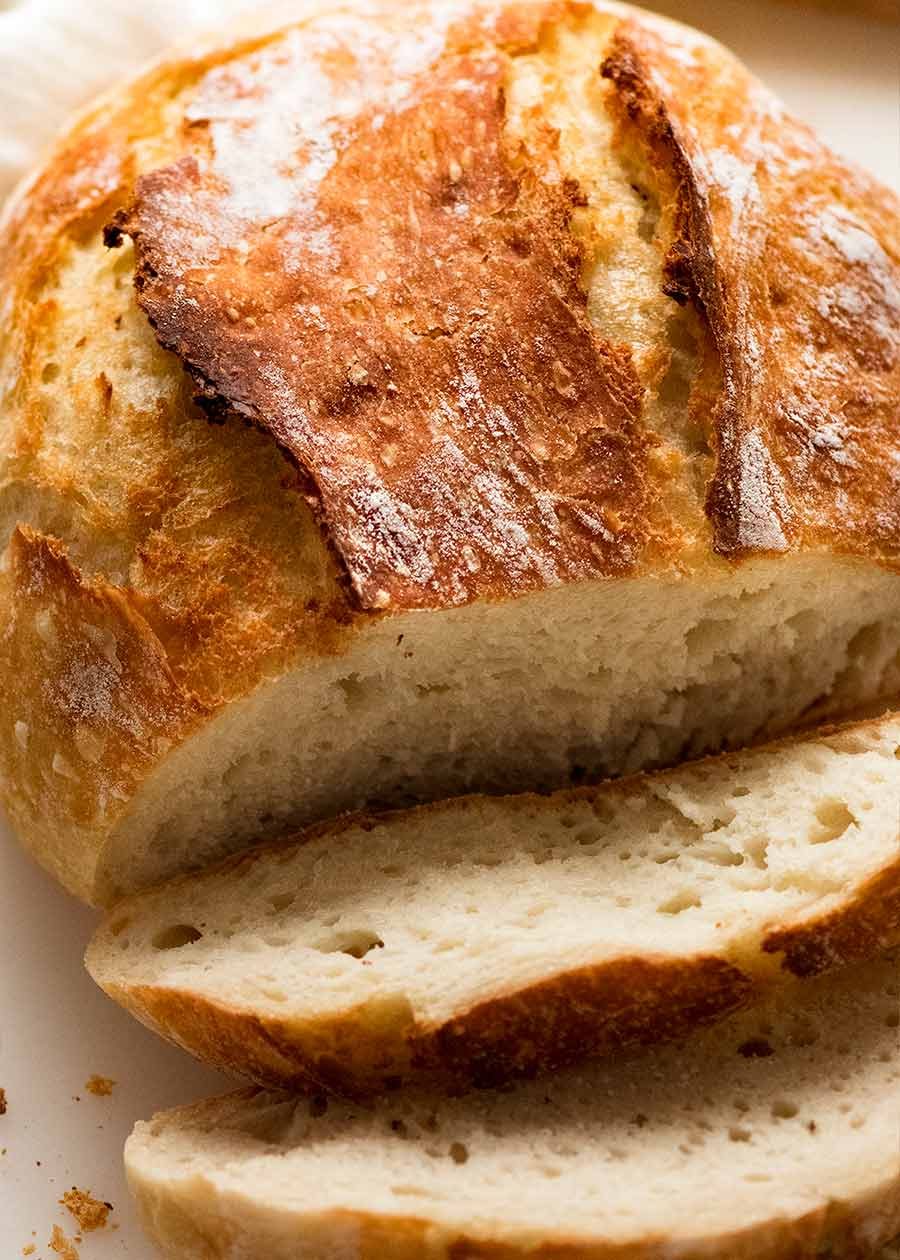
This is a phenomenal bread recipe. The best, EASY yeast bread you will ever make, beginners love how simple it is while bread connoisseurs appreciate the Artisan bread qualities – the thick crispy crust and chewy crumb with big fat holes like sourdough!
No knead, 3 minutes active effort, very forgiving recipe. Make this today, then the Cheese Bread version tomorrow!

Phenomenal EASY yeast bread recipe
This is an extraordinary white bread recipe with outstanding results. While it’s easy and forgiving, making it suitable for beginners, experienced bakers will recognise and appreciate the Artisan bread characteristics – large holes in the crumb like your favourite sourdough bread with that signature chewiness, and a thick, crispy crust.
It’s a gold nugget recipe, and you may never buy bread again after trying this!
Here’s why it’s so easy:
No knead, no stand mixer
3 minutes active effort – you won’t even get your hands dirty
Dutch oven (cast iron pot) ideal but not necessary
Incredibly forgiving dough, with rise times ranging from 2 hours to 3 days (yes, really, you choose what works for you)
Easy but yet no compromise on quality of bread

What you need to make this homemade bread recipe
Here’s what you need to make homemade bread from scratch – yeast, flour, salt and water. Yep, really, that’s it!
No yeast?
Make this famous Irish Soda Bread instead, or this incredible No Yeast Sandwich bread based on the traditional Australian Damper!

Yeast – my base recipe uses Rapid Rise or Instant Yeast which does not need to be dissolved in water. But it works just as well with normal yeast (“Active Dry Yeast” or just “dry yeast”) – you just need to change the order of the steps and dissolve the yeast in water first. The bread comes out exactly the same!
Best flour for homemade bread – use bread flour if you can. Bread flour has more protein in it than normal flour which means more gluten, and this makes the dough more elastic and yields a more fluffy yet chewy texture inside the bread, as well as creating the big holes you see in the photos, like sourdough bread. However, this bread is still spectacular made with normal flour too!
How to make the world’s easiest homemade bread – Artisan style!
Here are process steps with tips, but also see the video below – super handy to see the dough consistency, and how to form the dough.
1. Make wet sticky dough

Mix together the flour, salt and yeast, then add warm water and mix. The “dough” will be very wet and sloppy, not kneadable at all – this is what you want! See video at 17 seconds for consistency.
2. Rise!

Cover with cling wrap then place it in a warm place (25 – 30°C / 77 – 86°F) for 2 hours. The dough will increase in volume by double or more, the surface will become bubbly and the dough will be wobbly, like jelly. See video at 24 seconds for consistency.
OPTIONAL – develop flavour: Once dough has risen, you can bake immediately. OR, for better flavour, refrigerate for a minimum of 8 hours, up to 3 days. Time = better flavour development.
Bread in photos and video were baked immediately. I usually make this dough in the morning, refrigerate all day then bake in the evening. Or make the dough in the evening, refrigerate overnight and bake fresh in the morning! (10 – 12 hours in fridge). Beauty of this bread is that you can bake anytime!
No dutch oven? No problem! Just bake it on a tray – see the recipe notes.
3. Preheat oven & pot
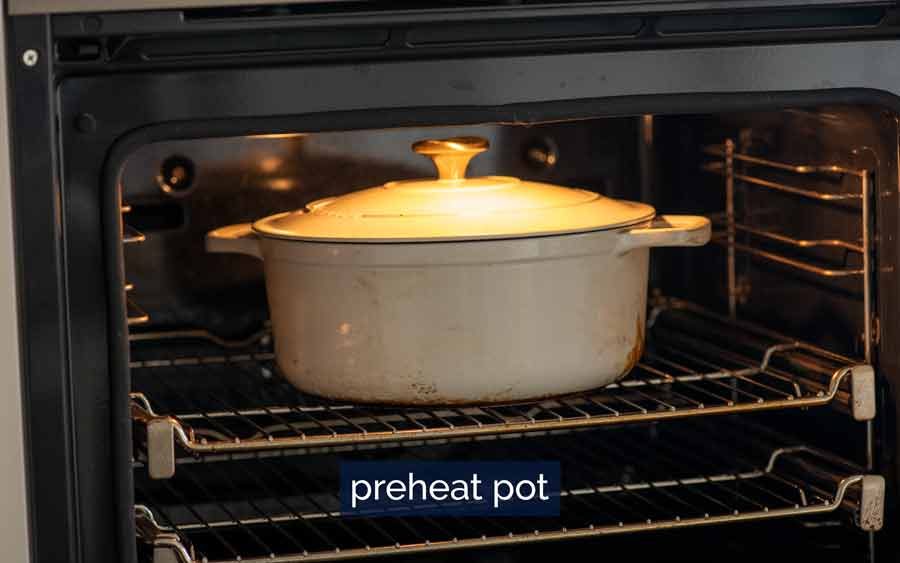
30 minutes before dough has risen, or while refrigerated dough is coming to room temperature, place dutch oven (cast iron pot) in the oven to preheat at 230°C/450°F.
Hot oven + hot pot = bread rising boost!
4. Scrape dough out
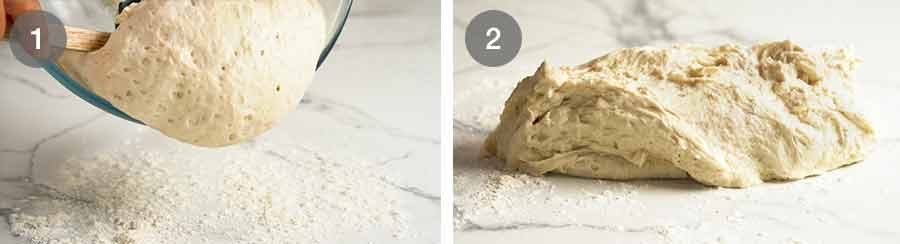
Scrape dough out of bowl onto floured work surface. It will be wet and sticky and that’s exactly what you want – because we will not be kneading it! In fact, you won’t even touch it with your hand.
PRO TIP: Dough handling and shaping technique devised to minimise addition of flour. Less flour = wetter dough = bigger air pockets, fluffier bread and more moist.
5. Shape the dough very roughly
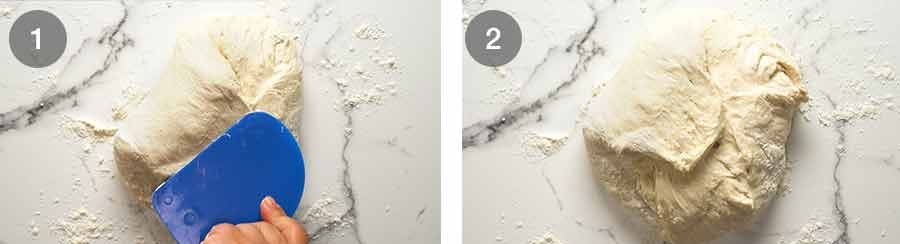
Use a dough scraper or anything of similar shape (spatula, cake server, or large knife) to fold the sides in so it roughly resembles a round disc.
Don’t get too hung up on the shaping – you’ll deform it in the next step!! This step is mainly to deflate the dough.
6. FLIP dough upside down onto paper
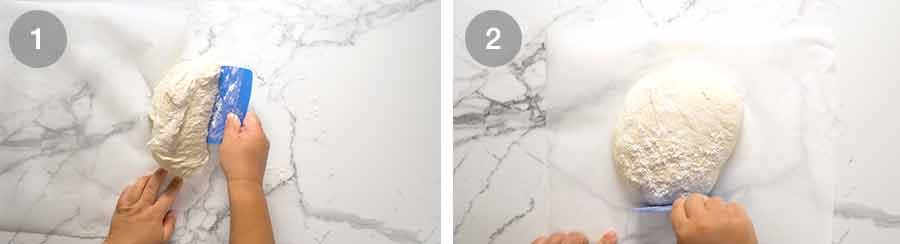
Slide a large piece of baking / parchment paper next to the dough, then flip it upside down onto the paper using the scraper so the seams from the step above are face down, and you have the smooth side up.
Slide/push the dough into the centre, then briefly reshape it into a round or slightly oval shape.
Do not get too hung up on a neat shape – this bread is supposed to be rustic! Besides, scruffier shape = more awesome crispy ridges
7. Prepare to bake!

Remove very hot pot from oven, then use paper to pick up the dough and put it in the pot, and put the lid on.
See recipe notes for no dutch oven method.
8. Bake!
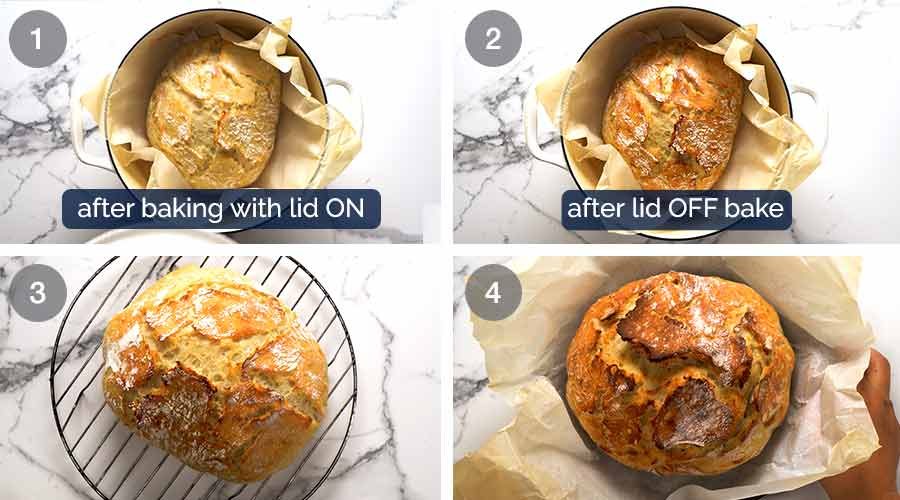
Bake for 30 minutes with the lid on (this creates a steamer effect, allowing the bread to rise while it cooks before crust sets), then 12 minutes with the lid off to brown and crisp up the crust. The surface will crack – and you want this, for extra crispy ridges!! And it looks authentic, just like the Artisan bread you buy at bakeries. 😇
Cool for 10 minutes before slicing. This is important – to let the centre of the bread finish cooking (if you slice too early, it will seem a bit doughy. Patience was never my greatest virtue, so I learnt this first hand!)
Remember – you can make this bread recipe WITHOUT a dutch oven!

Why this bread recipe works – and TIPS!
Loose, sticky dough = easier to rise than firmer dough.
No kneading = rough dough, but because the dough is so soft, it puffs up enough to “smooth out” the roughness.
Super forgiving dough – too stiff, add water. Too wet, add flour. Dough not rising? Move it to a warmer place. Takes 45 minutes to rise or 5 hours? It will still work. As long as your dough is the same consistency as what you see in the video and you let it rise to double the volume, this bread recipe will work as long as the yeast is not past its expiry date!
Why you need a preheated dutch oven for no knead bread recipes – to create a steamy environment to give the bread a rise boost before the crust sets (which stops the bread from rising). Professional bakeries are equipped with steam ovens – the cast iron pot is the home method!
Don’t have a dutch oven? No problem! Recreate the steamy environment by placing hot water in a pan in the oven, and bake the bread on a tray.
Big holes in the crumb – loose dough from less flour, high oven temp and preheated pot allows the yeast to give the bread a great rise boost, creating big air pockets. Also the use of bread flour rather than normal flour helps – you get less large holes using normal flour.
Bake immediately if it’s a bread emergency….
…but you’ll be rewarded with tastier bread if you leave the dough 8+ hours in the fridge! I normally make dough first thing in the morning (it takes 3 minutes!) then bake that night. Or make dough at night and bake in the morning. (~12 hrs in fridge for both scenarios)
Why refrigerating the dough creates a better tasting bread – because the fridge slows down the fermentation of the yeast (ie dough stops rising, if it kept rising it would kill the rising power of the yeast), allowing the enzymes in the yeast to do their work, transforming starch into sugar which creates a more flavourful bread. So we let the dough rise first, then refrigerate it.

All the ways to eat this bread!
Everything you do with bread you buy, you can do with this bread. It truly has the structure of bakery bread, so there are no limits!
Eat it fresh out of the oven, slathered with butter. Make sandwiches, toast it, mop plates clean, dunk it in soups and stews. Make bruschetta, garlic bread, grilled cheese, CHEESY garlic bread or Cheese and Garlic CRACK Bread!
I hope you enjoy this crusty bread recipe as much as I do. This really is one of those gold nugget recipes that you’ll make once and treasure forever! – Nagi x
Watch how to make it
Hungry for more? Subscribe to my newsletter and follow along on Facebook, Pinterest and Instagram for all of the latest updates.

World’s Easiest Yeast Bread recipe – Artisan, NO KNEAD
Ingredients
- 3 cups (450g) flour , bread or plain/all purpose (Note 1)
- 2 tsp instant or rapid rise yeast (Note 2 for normal / active dry yeast)
- 1 1/2 tsp cooking salt / kosher salt , HALVE if using table salt (Note 3)
- 1 1/2 cups (375 ml) very warm tap water , NOT boiling or super hot (ie up to 55°C/130°F) (Note 4)
Dough shaping
- 1 1/2 tbsp flour , for dusting
Instructions
- Mix Dough: Mix flour, yeast and salt in a large bowl. Add water, then use the handle of a wooden spoon to mix until all the flour is incorporated. Dough will be wet and sloppy – not kneadable, but not runny like cake batter. Adjust with more water or flour if needed for right consistency (see video at 17 sec, Note 5).
- Rise: Cover with cling wrap or plate, leave on counter for 2 – 3 hours until it doubles in volume, it’s wobbly like jelly and the top is bubbly (see video at 24 seconds). If after 1 hour it doesn’t seem to be rising, move it somewhere warmer (Note 6).
- Optional – refrigerate for flavour development (Note 9): At this stage, you can either bake immediately (move onto Step 5) or refrigerate for up to 3 days.
- Take chill out of refrigerated dough – if you refrigerated dough per above, leave the bowl on the counter for 45 – 60 minutes while the oven is preheating. Cold dough does not rise as well.
- Preheat oven (Note 7) – Put dutch oven in oven with lid on (26cm/10" or larger). Preheat to 230°C/450°F (220° fan) 30 minutes prior to baking. (Note 8 for no dutch oven)
- Shape dough: Sprinkle work surface with 1 tbsp flour, scrape dough out of bowl. Sprinkle top with 1/2 tbsp flour.
- Using a dough scraper or anything of similar shape (cake server, large knife, spatula), fold the sides inwards (about 6 folds) to roughly form a roundish shape. Don’t be too meticulous here – you’re about to deform it, it’s more about deflating the bubbles in the dough and forming a shape you can move.
- Transfer to paper: Slide a large piece of parchment/baking paper (not wax paper) next to the dough, then flip the dough upside down onto the paper (ie seam side down, smooth side up). Slide/push it towards the middle, then reshape it into a round(ish) shape. Don't get too hung up about shape. In fact, lopsided = more ridges = more crunchy bits!
- Dough in pot: Remove piping hot dutch oven from oven. Use paper to place dough into pot, place lid on.
- Bake 30 minutes covered, then 12 minutes uncovered or until deep golden and crispy.
- Cool on rack for 10 minutes before slicing.
Recipe Notes:
- Fridge up to 3 days – Rise dough per recipe, then leave in bowl and refrigerate up to 3 days. Flavour gets better with time. Dough will stay bubbly for a day or two, then will deflate – that’s fine. Shape into round and place on paper per recipe, then leave for 45 – 60 minutes to take the chill out of it, then bake per recipe. Cold dough won’t rise as well.
- Bread in photos & video is 2 hr rise, immediate bake.
- Cooked bread – great fresh for 2 days, then after that, better warmed or toasted. Keep in an airtight container or ziplock bag. This stays more fresh than usual homemade bread, especially if you use bread flour.
- Freeze cooked bread for up to 3 months.
Nutrition Information:
More bread recipes


Life of Dozer
Just keeping a close eye on it for me….

Good job Dozer. Here’s your treat. Look, I even buttered it for you! (PS He’s in his robe because it’s a rainy day yet I still took him to the beach!!!)

I received a request from Candace: Do you just fold the ingredients into the dough? before rising or after? I fold the ingredients I add to the bread before rising.
Am I the only one who thinks this recipe is a bit off? I added the 1.5 cups of water and it wansnt nearly enough, only brought my dough to a crumbly texture. Also are we baking at 450 degrees Fahrenheit for 45 minutes? I feel like it will burn.
I have made this bread recipe many times without pre heating the oven I put it in a cold oven then turn it to the temperature needed it works out exactly the same as pre heating
Great recipe to make with kids. Lovely!
I have an oval enameled cast iron with lid. Can I use this instead of a round one.
I’d like to make this in a rectangular bread pan. Should I still use the water?
I went from never having made bread to making a couple of loaves a week thanks to this so so easy recipe. Sometimes l refrigerate it other times l don’t, some batches seem ‘wetter’ than others yet they all taste great. If l had known making your own bread was so quick and easy l would have started years ago.
Maybe a dumb question… How does parchment paper work if the max temp is 420 degrees Fahrenheit & the bread needs cooked at 450?
I’ve made this bread probably about 6 times so far. Turns out every time I like to add a little bit more salt for flavor because I do not generally rest it overnight.
Super easy for beginner bread makers!
I’ve made this bread about 6 times now! The first 3 times were delicious. Yesterday I made 2 batches of it how I always do (I use active dry yeast, and let it rise in the oven with the light on). I let it rise for 3 hours and stuck it in the fridge for about an hour. When I took it out, it smelled so strongly of alcohol, that it burned my husbands and mine nose hairs when we smelled it. I tossed both batches and concluded that it was because I let it rise for too long. So I did it again today. I let it rise for 1.5 hours then I baked it. It smells and tastes (slightly) sour and alcohol still. I’m not sure what I did wrong. Especially since I’ve made this bread successfully before and it’s turned out delicious. If you have any insight, please let me know. I love this recipe but if I can’t figure out what’s wrong, I’m afraid I’ll have to find a new one :/
lovely recipe
how do i get a lighter crumb?
lovely recipe but the bread comes out very dense.
how do i get it to be lighter?
This is definitely my new go to recipe! It was straightforward and my bread came out beautifully. I plan on baking more and gifting to family and friends and will include a printout of your recipe.
Thank you for sharing your recipe. And my deepest condolences on Dozer’s passing. It’s never easy to say goodbye to our fur babies. Our family lost our first Golden when he was almost 15 and he was the BEST! We currently have two other Goldens who also keeps us on our toes.
I made it! I am so glad you warned about waiting to eat it. It was hard but I waited. It was as easy as you said except getting the dough onto the parchment. I’m so proud because it looks like the picture and guess what, I used my toaster oven. It’s absolutely delicious.
Has anyone added fruit to this bread to make fruit loaf 😋
I have finally mastered this recipe (it wasn’t hard, as it is foolproof, but I’m no baker). Do you have recommendations for a step up recipe for a new bread baker ?
Amazing, made this a couple of times during Covid and then had an urge to make it the other day. Forgot how delicious and easy it is. Will definitely be making it more often moving forward.
I started making this during Covid! It’s amazing. Only problem is that it always gets stuck in the paper! Any suggestions to keep that from happening
G?
AMAZING recipe, made this for my first time making bread and it was so forgiving when making mistakes. My family loved it.
It’s delicious! We live off grid so I Baked mine in my Weber bbq with the lid down. Left mine to rise for 2 hours.
Used a loaf tin and placed that in a large ceramic dish, filled the dish with boiling water as soon as I got the dough in the loaf tin. Shut the bbq lid for 40 mins, came out light and golden on top. So easy! Love not having to knead.